How Frameless Shower Doors can Save You Time, Stress, and Money.
Table of ContentsWhat Does Frameless Shower Doors Mean?The Ultimate Guide To Frameless Shower DoorsThe 5-Minute Rule for Frameless Shower Doors3 Simple Techniques For Frameless Shower DoorsFrameless Shower Doors for DummiesOur Frameless Shower Doors IdeasOur Frameless Shower Doors PDFsLittle Known Questions About Frameless Shower Doors.Some Of Frameless Shower Doors
Because these doors do use thicker glass, they need the appropriate equipment and installing to remain in location. Due to the fact that frameless as well as semi-frameless shower doors do not have a full side of steel, rubber, or other materials, they do maintain a gap between the door and also the flooring of the shower.
— Cloud Links (@ldcloudlinks) December 30, 2022
On the other hand, the door design is much less vulnerable to pooling water, so it really makes the shower much more resistant to mold and mildew. Because there are possible drawbacks with frameless shower door setup, it is very important to deal with a relied on glass installer to keep your shower functional and also attractive for years to come.
Not known Incorrect Statements About Frameless Shower Doors
In our last short article we talked regarding how you can mount your own frameless, tub shower unit for under $500. Certain, you can have this done for you if you can find a reasonably valued glass service provider. Similar to all residence structure activities, sometimes the prices are too horrendous and also we should take issues into our very own hands.
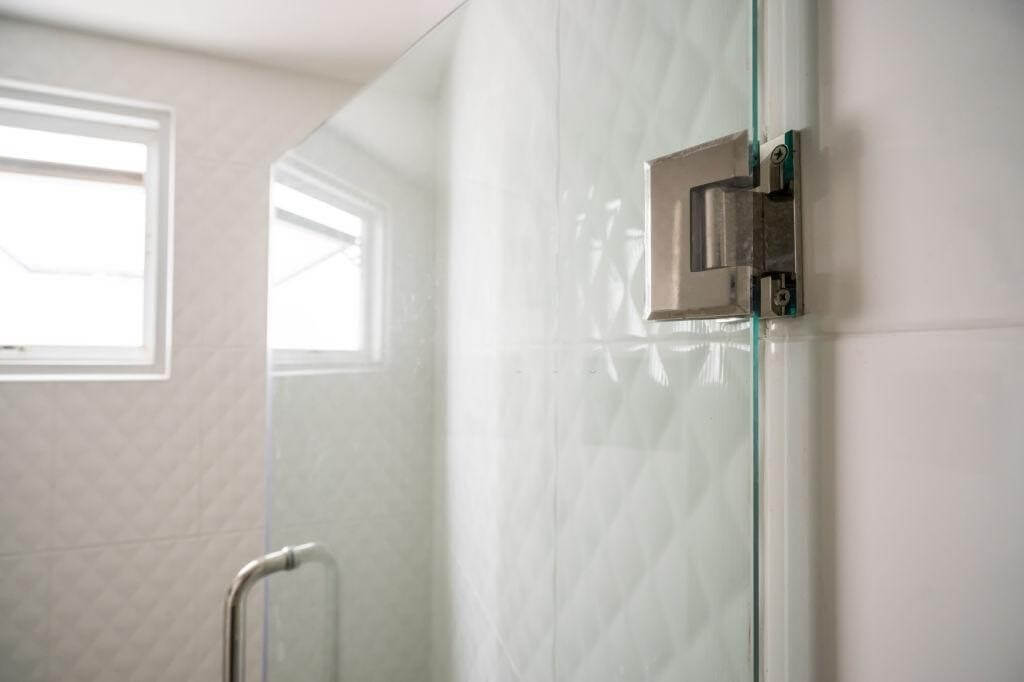
The very best way to do this is to locate a stud in the wall to protect them to. We changed the tile in our shower as well as when we had the drywall board down, we noted the stud locations. We then acquired three inch stainless screws to protect the braces to the studs.
Frameless Shower Doors - Truths
Otherwise, you will certainly need to make use of the drywall supports offered (make use of the 5/16 drill little bit for the drywall anchors). Mark the areas of the brackets where they attach to the fixed panel on the wall surface. Be sure to get the wall brackets in the proper location or you will have to go back and relocate them.
Use your level to obtain them exactly plumb as well as focused over the tub or shower ledge. Secure the wall braces right into location seeing to it the screw hole on the braces face the shower. Since our task was a total shower remodel, we mounted the braces before ceramic tile (straight on top of the drywall) and afterwards tiled approximately them.
Frameless Shower Doors Fundamentals Explained
kneewall). Make certain the dealt with panel remains in the appropriate locationat the wall surface braces and also plumb, level and also straight with the opening - Frameless Shower Doors. Mark the area where you will require to pierce for the screw. If you have an actors iron bathtub like we did, you will need to utilize a titanium bit to survive this hard click over here product.
Very carefully drill the hole and protect the bracket to the bathtub making certain the screw opening on the brace encounters the within the bathtub. Brace for Fixed Panel at Bathtub Currently that you have the 3 major assistance my response brackets installed for the set panel of your bathtub shower room, you can secure it right into area.
The 10-Second Trick For Frameless Shower Doors
Be sure to always position the rubber gaskets offered in between the glass as well as the steel brackets/hinges. Use the screw covers supplied with the tub shower unit kit to create a personalized, ended up look.
Again, we noted the place of the studs so we can protect the brace with a 3 inch stainless screw to the wall stud. If you can not discover a stud in this place, you will need to utilize a drywall support. Apply silicone around the opening prior to mounting the screw and bracket in position.
The Basic Principles Of Frameless Shower Doors
Tighten the screw into the wall bracket. Currently you can set the assistance arm for your bathtub shower unit in like it position and also safeguard it with the allen wrench at both ends. First disassemble the joints. Take the side of the hinge with the screw openings and established them into place in the set panel on the within the shower.
Now protect the opposite of the hinge to the set panel of glass with the allen wrench and screws given. Once again, make sure no steel touches the glass (rubber gaskets need to be in between). Now have your close friend set the glass door on the joints and also hold it in area while you secure the hinges to the door from inside the shower.
A Biased View of Frameless Shower Doors
The weatherstripping helps keep water inside y0ur bathtub shower unit. Cut the lower door weatherstrip to fit with your energy blade and also slide it onto the bottom side of the door. Now reduce the joint side weatherstrip and also glide them onto the door. Be careful when reducing these as they are an essential component of the watertight system.
Silicone for Watertight Bathtub Shower Unit The last action to your installation is to make sure the set glass panel of your bathtub shower enclosure is likewise leak-proof - Frameless Shower Doors. The best way to do this is by using a premium quality caulk (100% silicone that is mildew resistant) to secure the glass to the wall and tub walk.
The Best Guide To Frameless Shower Doors
Instead of take a success in our budget plan, we determined to take on the job ourselves. No tags.
/cdn.vox-cdn.com/uploads/chorus_asset/file/19496924/howto_bathdoor_04.jpg)
Getting The Frameless Shower Doors To Work
This collection is offered at a discount rate price when acquiring a personalized frameless shower door. Tape down 3/8" shims for your door to hinge on. (You can use the items of the plywood that came with the crate) OK, currently it's tomorrow. Set the door in place, holding it flawlessly in the upright position, and also note the joint screw hole locations the tile with a pencil.